|
SURDS User Guide
TABLE OF CONTENTS
SURDS OVERVIEW
SYSTEM REQUIREMENTS
LOGGING INTO WEBSITE
SITE NAVIGATION
SUBMITTING A FILE
SIGNING OFF ON A FILE
SURDS OVERVIEW
The SURDS Data Submission Website enables Higher Education
institutional users to login to a DHE web-based application to submit and
validate text and comma-delimited files.
The purpose of the website is to provide institutional
users with an easy-to-use, efficient system that reduces the amount of time lost
in the communication process between institutional users and DHE staff who
process the data.
Upon successful submission and validation of a data file,
users are presented with summary reports describing their submitted data that are
used as a tool to help the institution verify the validity of the data that is
processed by DHE (helps institutions determine if DHE and/or institution are
in agreement in regards to the specific data being processed). This in turn
helps the institutions determine if they are ready to “Sign Off” on the data.
SYSTEM REQUIREMENTS
The SURDS Data Submission Website utilizes Microsoft
technologies and therefore requires that the client computer have the following
technology available to them:
- Internet Connectivity (DSL, Broadband, or other high speed internet)
- Internet Explorer or Firefox web browser; This website does contain a Javascript menu
that may be blocked by your browser if you have your browser security settings
at HIGH. You can verify your settings by clicking "Tools" / "Internet Options" /
"Security" tab from your browser menu.
LOGGING INTO WEBSITE
To access the website, go to the following address:
https://surds.colorado.gov/data/db (see Figure 1)
You may first be presented with a
“Security Alert” box stating that you will be communicating data in an encrypted
format (for security purposes). Click “Yes” to proceed.
Figure 1

Enter the assigned username and password combination assigned by CCHE and click
the “Login” button (see Figure 1). The username/password combination is sent
over the Internet back to DHE webserver in an encrypted format for security
purposes.
If you do not have a username, contact DHE support staff to obtain your credentials.
Values are required for the username and password textboxes. If either
or both are left empty, a message is displayed to the user indicating so. If the
username/password combination is incorrect the user will be notified and asked
to re-enter username and password values. Acceptable characters
for these fields are A-Z, a-z, 0-9, and characters. No spaces
allowed.
If you have forgotten your password, enter your username, click “Forgot
Password?” and your password will be sent to the email that is on record for
that username. See Figure 2.
Figure 2

If unable to login or your email has changed
since the account was established, contact DHE to verify
username/password credentials.
Upon successful login, the Data Collection Home page is
shown and menu options shown in Figure 3 are displayed.. The Data Collection Home is the primary navigation point from
which all functionality is accessible.
SITE NAVIGATION
The navigation menu is located at the top of each page. Once successfully logged
in to the site, this navigation menu persists from page to page. Depending our your credentials and access, the menu of applications may be different than what is shown in Figure 3. In this example, the user has access to SURDS.
Figure 3

Main Navigation - Used for access to basic functions available in the DHE Data
Collection portal. This is not specific to one application, such as SURDS
- Summary - This will list all the institutions for which you have access and
provide basic information about functions available to the current user
- Reports - Basic reporting available to the current user
- Admin - Update user information such as first name, last name and email.
User may also change their password on this page.
- Documentation – Allows the user to view documentation
including the Data Dictionary, File Layouts, and Field Definitions. These files
contain specific validation rules as they apply to a specific file-type. The
file layout includes a template displaying the layout of the textfile and how
many characters and character types of all data fields. The Data Dictionary
contains details on every field including edit specifications, field length, and
summary of its purpose and use.
- Logoff – This option ends your session and returns you to the login
page.
Sub Navigation
- Lists all applications availabe to the current user. In Figure 3 above, only
SURDS is shown
Click SURDS to enter the SURDS application.
SURDS Navigation (See Figure 4)
- BACK TO MAIN - links back to the home page of DHE Data Collection for the user
- SURDS FILES - drops down all the available files for submission and review
- FILE REPORTS - access to file summary reports and allows user to select file type, term and year
- DOCUMENTATION - links to SURDS documentation and lookup tables
SURDS Sub Navigation
- File Type(s) and Report Term(s)
make up a sub-menu for the user to link directly to a specific term. These
options will change from time to time as new terms become available.
- On
secondary screens, the user will have links to “Current Files”, “Approved
Degrees”, "Errors" and other specific to user functions
Figure 4

The SURDS Home page provides users access to work with specific filetypes (i.e.,
Degrees, Enrollment, Undergraduate Applicant, Financial Aid) and specific
institutions. If the user has access to multiple institutions, the default page will be a list of institutions rather than files. Click one institution to proceed into the file submissions. Figure 5 displays Enrollment files.
Figure 5

To begin the process of submitting a file, click the SUBMIT button on the same row as the term and year that is being submitted.
SUBMITTING A FILE
On the file submission page (See Figure 6), the expected file information is displayed, including institution, file type, term and year. The "# Files In Progress" informs how many other files are currently being submitted. During high traffic times, the number of files can dramatically affect the processing time of the file.
For specific file layouts, review SURDS documentation by clicking the "Documentation" link in the SURDS navigation bar or DHE's website - http://highered.colorado.gov/i3/More/Docs.aspx
File Format
There are two types of valid file formats: 1) fixed length (*.txt) and 2) comma-delimited (*.csv). Following the field order specified in the file layout and field definitions documentation, the file may be structured in either format, whichever is preferred by the user. No field headers are included in the file, only data. Click to see sample files - fixed length, comma-delimited
Submission Mode
Submission Mode is a feature that allows the user to select between two submission options: 1) Submit and Validate File or 2) Preview Data File Only. For new users or those submitting a new file, using "Preview Data File Only" shows how the file will be imported, displaying the fields of the first several rows of the file. This is an effective way to test the format of the file without fully importing and validating the file. Importing and validating a file that has an incorrect file layout will generate many errors and take much longer to process.
Figure 6

If a file has been submitted, the user can submit a new file in order to
replace the existing data. If the combination of institution/file type/term/year has been submitted and SIGNED OFF, the file is locked and no submissions will be accepted.

Previewing the File
On the file submission page, select "Preview Data File Only" as the submission mode, then click the “Browse” button
and navigate to the appropriate fixed-length or comma-delimited file on the
client machine (user’s computer). Select the file and click the ‘Open’ button
(see Figure 8).
Figure 8

Once the file has been selected to submit (verify that the path to the file is
in the “Select a File for Submission” text box), click the “Upload!” button
to begin the validation process.
The file will be read with the same process that is used during importing and validation but will be displayed for your review. If the file layout is in the expected format, the data should be reflected in a data table similar to the one displayed in Figure 9. The first 10 rows of the file will be displayed showing every column in the file layout. You may need to scroll to the right to view all the fields. At the bottom, the file details are displayed including the file type, file size and file name after it is copied to the server.
Figure 9

Submitting and Validating File
The submission of the file is similar to the previewing process except for the selection of the "Submission Mode." Make sure "Submit and Validate File" is selected as the "Submission Mode" and select the file as specified above. After clicking "Upload!", the process has four steps:
- Importing file definitions and copying text file to server
- Importing data from text file into database
- Validating file
- Generating Reports
What happens during processing?
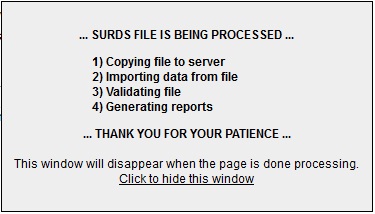
While the file is processing, the browser will appear busy. This may be signified differently depending on the browser. An example is shown in Figure 10. During file processing, the site will post a message while the file is being processed, see Figure 10A. This message will disappear when the file processing is complete. This may take several minutes or longer depending on the file size and server workload.
Figure 10

Figure 10A
File Processing
Once a file has been selected and the “Upload!” button is
clicked, the validation process begins and the following steps occur:
- The text file (fixed-length or comma-delimited) is transmitted over the Internet from the user’s
computer to DHE’s server.
- DHE server checks the filetype of the submitted
file, and if the file extension is not .TXT or .CSV, the user is given an error message
stating that the file was not received by DHE because the correct filetype was
not submitted. The user must resubmit a valid file.
- Once a text file
(.TXT,.CSV extension) is submitted, DHE’s server opens the file and counts the
number of characters per row. If any row in the file is not the specified length (per File Layout Documentation), an error message is displayed to the user
stating that the file was not received by DHE because the data is not in the
correct format (refer to Data Dictionary for rules). The user must resubmit
a valid file.
- When a text file is submitted and all rows of data
are of the correct fixed-length, the file is then submitted.
- After the importation, the next phase of the validation process
begins. DHE iterates/loops through each row
sequentially and begins to validate the data based on rules clearly defined in
the data dictionary.
- After validation has finished successfully, the user will be directed to a file summary page (See Figure 14 below).
Upon successful file submission and validation, the user is left with two possible scenarios, either there are no file errors or there are file errors:
- a. Text file is free of errors
- i. Reports are available by clicking the link
under the “Records” header displaying the number of records submitted.
- ii. If
satisfied with the reports, begin the sign-off process. If unsatisfied with the
reports, the user can resubmit a file.


- b. Text file contains errors
- i. Click the
link under the “Errors” header displaying the number of errors. The error
summary page will be displayed (See Figure 13)
- ii. On the Error Summary page, the
user can browse the error codes, descriptions, and total number of errors. By
clicking the “Error Id” for the specific error, the user can view up to the first 100 errors for that error ID. If more than 100 errors exist for an error ID, the link below the heading "Count" will display all the errors.
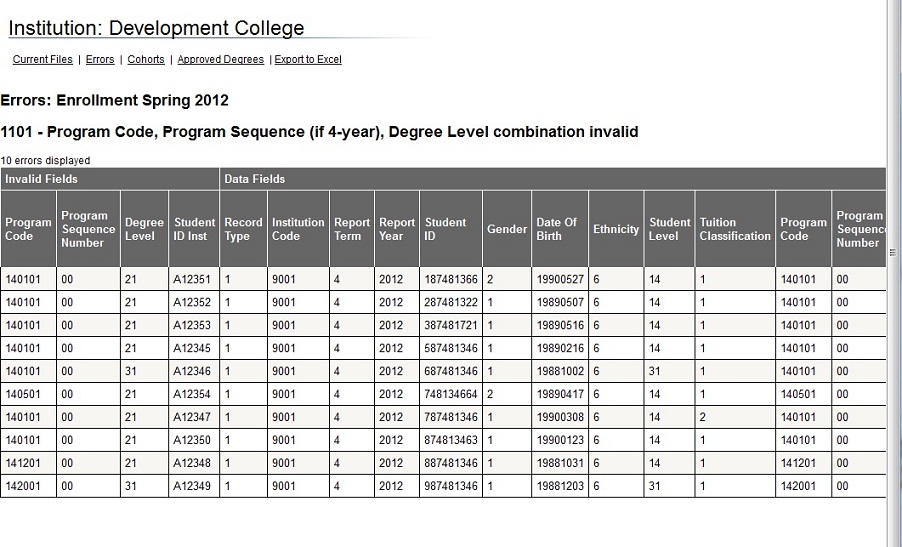
- iii. Error Detail (Figure 14) displays the error details for the selected error. Under the “Invalid Fields” header, all fields that are
involved in the error are displayed on the left side of the table and have links
to the Field Definitions page.
- iv. Under the “Full Record” header, the entire
data record is displayed with appropriate field headers to view why this record
is in error and assist in locating the record for correction.
- v. This table can
be downloaded into Excel by clicking “Export to Excel”
Figure 13

Figure 14
What happens when it is done processing?
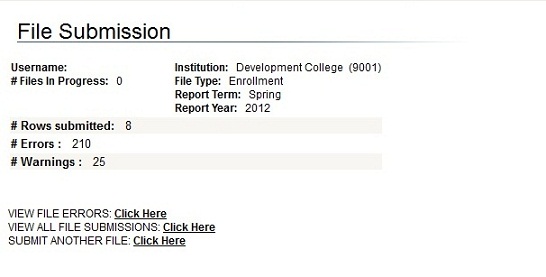
When the file processing is complete, the user is directed to a submission summary page. See Figure 15. The summary includes the number of rows submitted and the number of errors and warnings created. There are three links at the bottom:
- View File Errors - Error summary for current file
- View All File Submissions - SURDS home page
- Submit Another File - Back to the File Submission Page
Figure 15
SIGNING OFF ON A FILE
From the SURDS home page, when the file submission
contains zero errors, the user is displayed with a link entitled “Sign Off.” Click the padlock icon.
On the
summary page, review the information for the file that is to be approved. Review the file information and the statement of agreement. Click Continue.
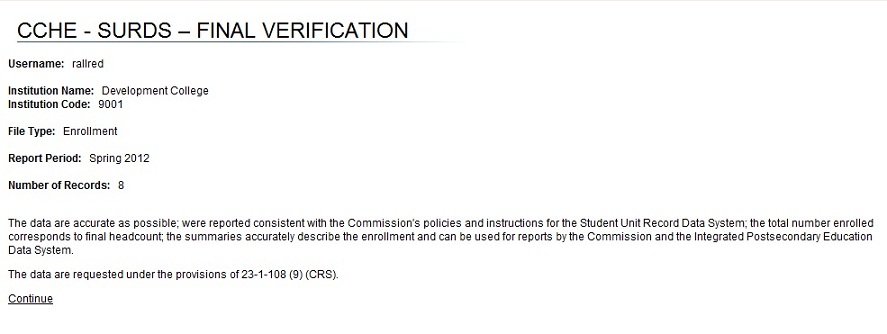
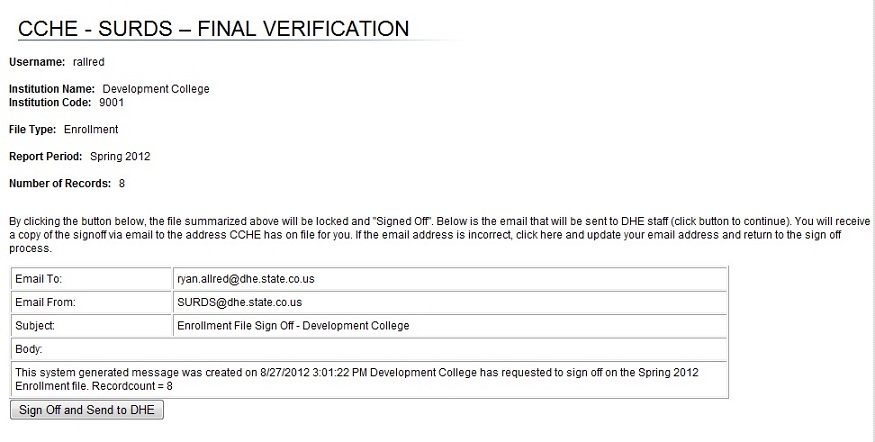
The next page is a confirmation of the email that will be sent. Click “Sign Off and Send of CCHE” to finalize the approval.
Once the file has been signed off, the user is unable to submit more
files for this file type/report term/report year. The reports remain available
for this approved data.
|